In October 1941 the 2nd Battalion were in Syria. All Companies were preparing to move on Friday 17th October to make way for the 2/2 Australians. G1098 kit (mobilisation scale of clothing and equipment) was handed over as the Battalion move was to be with rifles, equipment and small kit only.
At 0630 on Saturday 18th October the Battalion (less "D" Coy) and 3 Companies of the Bedfordshire and Herts. Regiment went by RASC transport to Es Zib transit camp arriving at 1400. "D" Coy was to follow on Monday 20th with the Yorks and Lancs. Regt.
The next day (1630) the Battalion was taken to Nesher railway siding outside Haifa to entrain at 1900. The train moved off at 2000 and arrived at Kantara (east) on Monday 1000.
A derailment between Alexandria and Ismailia caused some delay and it wasn't until 1500 that the first company crossed the Canal by ferry. The whole Battalion with the Beds and Herts was eventually entrained at Kantara (west) by 1730 when the train moved off.
They detrained at 0200 at Amriya and after a meal marched to camp � of a mile away. Reveille at 0730 was followed by a day spent issuing battledress, winter clothing and pay parades. 5 Subalterns (2/Lts Cromarty, McHardy, McBane, Menzies and Hardy) and 34 Other Ranks joined the Battalion. RASC transport arrived to move the Battalion. This took place after reveille at 0130 on 22nd October. A rear party under Lt Nicholson was to stay behind.
At Alexandria 0345 the 2nd Black Watch boarded 2 destroyers (Hotspur, Kingston) and the mine laying Cruiser Latona. HQ Coy was aboard Kingston, with Major Green and a small party on the Latona, and the rest of the Battalion on the Hotspur.
OPERATION CULTIVATE
The Australian Government had requested the replacement of Australian Troops at Tobruk. Operation "Cultivate" was the last stage of this and started on 12th October and continued until 26th of that month although it was never quite completed for on the evening of 25th on her last trip to Tobruk the Latona was sunk.
These voyages took place during the moonless periods to reduce the dangers on what was an extremely hazardous trip for the Royal Navy. Indeed Admiral Cunningham C-in-C Mediterranean had been against this last phase and could point to a long list of ships lost and damaged to justify his position.
Every night the Latona carried 150 tons of stores and 25 men westward while the destroyers took either 450 men and 15 tons of stores or 75 men and 50 tons of stores. During the whole operation 7138 men were taken to Tobruk and 7961 brought back to Egypt.
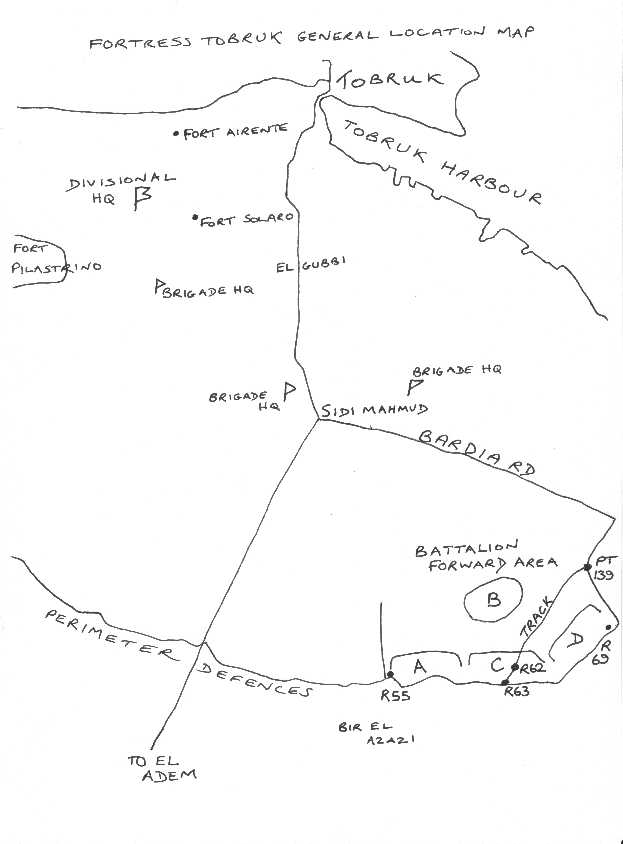
The Black Watch sailed at 0530 on the 22nd. The voyage was recorded as being uneventful. At 1700 the fighter escort of 24 Tomahawks was picked up off Sollum. The ships tied up at Tobruk at different parts of the harbour at 2230. After embussing the battalion was driven to the reserve Brigade area around Fort Pilastrino about 4 miles from the harbour.
TOBRUK
Tobruk owed its' importance to the fact that it was the only good harbour on the North African Coast between Alexandria and Sfax.
The town itself stood on a small promontory, which formed part of one arm of the bay. From the town itself the land fell away and then gradually rose to an escarpment about 450ft above sea level south of the town. This escarpment of rock outcrop was covered with dust and sand and ran parallel to the coast from east to west so that much of the area of Tobruk was in a basin.
In 1911 the Italians had annexed Tripoli and established a navy base at Tobruk. When Mussolini came to power the defences and fortifications of Tobruk were considerably strengthened.
In the pre-war years the Italians built a series of defences that enclosed an area around Tobruk of about 135 square miles. These consisted of a double ring of concrete emplacements 8/9 miles from the town and harbour covering a frontage of some 35 miles.
Steep wadis that were impassable to tanks and mechanised vehicles protected the eastern and western extremities of the perimeter. For the greater part of its' length the perimeter ran across a flat featureless plain protected by an anti-tank ditch and rusting barbed wire. This ditch had not been completed. So fortress Tobruk lay in a basin as an enclave in the desert.
Within the enclave 2 macadamised roads one leading to Derna the other to Bardia intersected the desert. From the Bardia Road another macadamised road forked inside the perimeter 15 miles south of Tobruk.From the Derna road a macadamised road forked off to Acroma.
Later the perimeter defence system was strengthened and became known as the "Red Line". It took the form of 16 zones or islands coverimg about 2 miles of territory and linked by telephone. These were made up in all of about 140 strong points, posts and little forts some of which were surrounded by anti-tank ditches and barbed wire.
Spaced at intervals of about 150 yards these concrete emplacements resembled lighthouses with all but their top platform dug into the ground and galleries running off; all were capable of taking a platoon. The galleries were dark and damp and unlit except by candles. Most of these dated from 1935/36.
Between these posts and also behind them were dugouts, dug into the hard desert by pneumatic drills, known as "douvres" or "speeties".
Two miles behind this perimeter the garrison constructed a second defence system known as the "Blue Line". This was composed of a continuous minefield covered by barbed wire and the fire from anti-tank guns and machine guns dug into well wired and mined strong points.
As time went on these positions were made stronger and the area between the red and blue lines were so thickly sown with mines that the sappers could no longer keep track of them.
SUMMARY OF THE WESTERN DESERT CAMPAIGNS
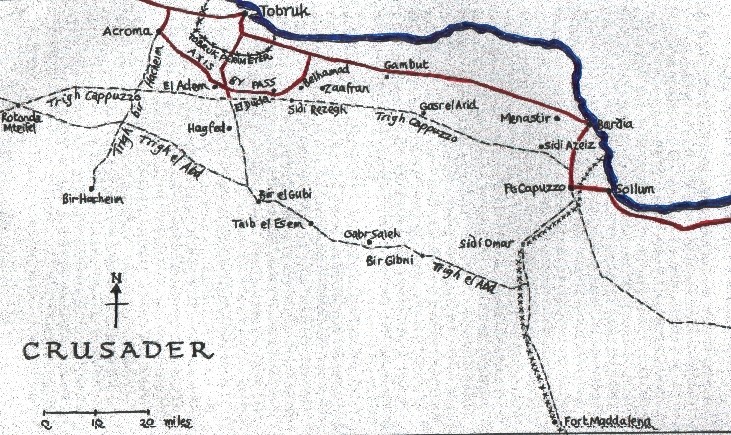
The Western Desert stretched from El Alamein in the east to Gazala in the west; north lay the Mediterranean and to the south the Jarabab and Siwa Oases.
The British attacked the Italians on December 9th 1940 under Major General O'Connor and the C-in-C
General Wavell. They advanced to El Agheila by 8th February 1941 with Tobruk surrendering on January 22nd.
Following this campaign the Germans reinforced their allies with the Afrika Korps under Rommel. He counter-attacked on the 24th March 1941. The whole of Cyrenaica was occupied apart from Tobruk .It was attacked on April 13/14, April 16/17 and April 30 to May 4. The attack failed on the 4th and Tobruk was then invested for the next 7 months.
The besieging troops were mainly Italian and belonged to the following 6 Divisions: the Ariete and Trieste (the 20th Motorised Corps), the Pavia, Bologna, and Brescia (the21st Infantry Corps).
Once Tobruk had been besieged the Royal Navy had the job of keeping it alive.
TAKING OVER AND SETTLING IN
The Garrison at Tobruk was under the command of General Scobie and consisted of the British 70th Division, the Polish Carpathian Brigade and the 32nd Army Tank Brigade.
70th Divisional HQ assumed command of all troops in the Fortress from 1700 hrs 22nd October 1941.Fortress Tobruk ceased to exist as from 2359 hrs 13th Dec 1941.
70th Division consisted of 14th Infantry Brigade (1 Beds and Herts, 2 Yorks and Lancs. 2 BW), 16th Infantry Brigade (2 Leicesters, 2 Queens, 2 Kings Own) and 23rd Infantry Brigade (1 Essex, 1 DLI, 4 Border).
32nd Army Tank Brigade under Brigadier A C Willison was made up from 1st Royal Tanks, 4th Royal Tanks, and 7th Royal Tanks). There was also a squadron of Armoured Cars operated by the Kings Dragoon Guards.
Thursday 23rd October
The Battalion was taking over from 2/15 Australians. An advanced party of the 2nd BW passed on information concerning the whole of Tobruk defences. Unfortunately 3 members of "C" Coy were wounded after stepping on a "money-box" Italian mine.
Friday 24th October
The taking over process continued amid air raids albeit well away from the Battalion area. The handing over was recorded by the Australian CO for broadcasting over the Australian networks. Colonel Rusk the CO spoke along with Captain Stirling and Piper Ogilvie played on his chanter.
The 2/15 Australians started leaving at 2015 for Egypt. Captain Dalrymple became the Divisional, and Lt McLeod the Brigade, liaison officers.
D Coy and the rear party arrived.
Water discipline was to be � gallon fresh and � gallon salt water per man daily.
The Battalion role in the area was to have been a counter-attack one and the annihilation of parachutists.
Saturday 25th October
A Brigade conference was held at 0900 attended by Lt Col Rusk to discuss the Brigade takeover of the Eastern sector. The BW was to replace the Queens Royal Regt as the right forward battalion of the sector.
Bombing of the town was again taking place in the evening when the rear party of the Australians left. The fortress was now manned by British and Polish troops with a few Czechs.
Sunday 26th October
Company Commanders conference 0900 followed by an advance party leaving for the front line. It was dive-bombed and shelled on its way to the forward areas. The Australian rear party returned having waited till 0400 for a ship.
Monday 27th October
A severe sandstorm prevented any activity by either side.
Tuesday 28th October
The Queens Royal Regt advance party arrived in the battalion's area prior to moving to our present position.
Wednesday 29th October
The Battalion was preparing to move to the forward line to be the right hand battalion of the eastern sector. The battalion moved by companies starting at 1800 and had finally taken over by 2200 when the Queens Royal Regt rear party left.
IN THE FRONT LINE
Thursday 30th October
At 0015 Major Sir Keith Dick-Cunyngham was badly injured by an anti-tank mine exploding under his company's ration truck as he was standing on the running board in "D" Coy area. He later died of wounds and was the battalion's first loss. The driver had misunderstood a command and had gone off track when it blew up.
A mild dust storm blew up during the day and battalion positions were shelled periodically. About 120 shells fell altogether.
1st November
Patrolling was to take place during this period from posts R55, R57, R59, R61, R67 and R69. Patrols were active this day but no enemy was encountered. A and D Coys on the right and left of the battalion's front reported that working parties could be heard 2000 yards out in their section of No Man's Land.
During the day C Coy reported 134 shells, A Coy 62 and D Coy 35.
At 1430 the funeral took place of Dick-Cunyngham at Tobruk Cemetery.
2nd November
Patrols out from each forward Company and again encountered no enemy but heard working parties. These were joining and consolidating the Forward Defence Localities (FDL'S) known as Bondi, Tugun, Jill and Butch that they had recently occupied.
They had been in British hands but were too far forward of their FDL'S to be strongly defended.
3rd November
The enemy opposing the 2nd BW were the Italian Bologna Division.
132 shells and 11 mortar bombs landed in the battalion's FDL'S.
4th November
Patrols again put out after dark but bright moonlight restricted operations, as visibility was too good. "A" Coy's patrol was fired on from Tugun - Bondi areas by machine guns and mortars but there were no casualties. The enemy also attempted to surround "C" Coy's patrol but they were evaded. This 40-50 strong party of the enemy then blundered into the anti-tank ditch forward of post R67. "D" Coy fired on them and they withdrew with one man apparently hit.
During the day the battalion was heavily shelled - 492 shells (75mm) and 72 mortar bombs - falling in the whole area. There was one man killed in "C" Coy.
5th November
Patrols out during night but little enemy activity. "C" Coy reported they received 79 shells, "D" 63 and "A" 21. The battalion's 3" mortars could not reach enemy positions in retaliation but the British artillery could.
6th November
At night "A" Coy patrol discovered an enemy minefield 2000 yards out in NML connecting Bondi and Tugun. The working party was fired upon and it withdrew in a vehicle.
Shelling was heavy - 274 on FDL'S during the day - and the enemy appeared to be trying to blow up anti-tank mines in front of "C" and "A" Companies where there is no anti-tank ditch. "C" Coy reported that 75 yards of protective minefield had been blown.
7th November
Patrols were cancelled due to the fear of enemy artillery retaliation following on from a raid that was to take place by the Polish Brigade with support from British artillery.
An enemy patrol again appeared in front of "D" Coy investigating the anti-tank ditch but dispersed and withdrew before a patrol from "C" Coy could deal with it.
Vickers machine gun shoots onto Tugun are frequently made from the battalion area by a mobile platoon from the Royal Northumberland Fusiliers.
Shelling was normal and the battalion was preparing to move back to the reserve brigade area after the Queens Royal Regt had taken over.
INTO RESERVE
8th November
The takeover was effected without incident with the last Company reporting over at Fort Pilastrino at 0200.
A Brigade conference was attended by Lt Col Rusk and was followed by a Company Commander's conference to consider plans for an impending offensive in co-operation with the 8th Army.
The battalion was to have an important role in what was to be known as Operation Crusader. 14th Infantry Brigade Operational Order 2 of 7th November was received detailing the part the Black Watch was to play.
9th November
An advance party from the Yorks and Lancs arrived, as they were to take over Pilastrino whilst the Battalion left for Sidi Mahmud to take over from the King's Own Royal Regt. Sidi Mahmud was in the eastern sector reserve battalion area on the blue line.
Company representatives attended a demonstration of tanks so as to facilitate recognition.
10th November
During the night the battalion moved up to Sidi Mahmud with the last Company arriving at 0400.
PRACTICE BEGINS FOR THE ATTACK ON TIGER
11th November
A rehearsal attack in co-operation with tanks was postponed but Company representatives made a reconnaissance of the area over which it was to take place.
Rations consisted of bully beef, biscuits or canned meat and vegetables. NAAFI supplies were strictly limited to a meagre supply of cigarettes and matches with the occasional packet of biscuits, tins of fruit or tubes of sugar gums.
The only communication was by sea and the journey was only made in the moonless period so as to avoid bombers and "Bardia Bill" which was a long-range gun that shelled the harbour.
12th November
The practice attack took place across FDL'S onto an objective with the infantry following behind the tanks. The companies arrived in the assembly areas on the plain that ran down to the sea by 0500. At 0600 all were in position on or behind the start line with "B" Coy as the light Coy in front.
At zero hour the "I" Tanks and carriers and armoured cars of the King's Dragoon Guards came through and all moved off.
The light company travelled at 4mph directly behind the tanks and the remainder at 2-� mph. It was estimated that the tanks would reach Tiger in 28 minutes and B Coy in 32 minutes.
The rehearsal was observed by the Brigadier of Tanks and by the Brigadier of 14th IB.
The battalion returned for breakfast at 1000.
Major AA Pitcairn (2nd i/c) went up to Garrison FDL at "D" Coy of the Queens Royal Regt to reconnoitre the battalion assembly area for the approaching operation.
13th November
The CO went down to division in the morning to see a sand table model of the ground to the SE of the FDL and to discuss plans for the attack on "Tiger". The Company Commanders and Platoon Commanders studied it and had it explained to them by Brigadier Chappel.
14th November
Companies were practising an assault on wired positions each day in Company areas. The CO went to Division to study air photographs just taken of the enemy positions outside of the SE sector that will be the objectives in the coming operations.
15th November
Convoy came in with the first mail received by the battalion at Tobruk. Lt H V McIver Campbell arrived with 6 Other Ranks.
16th November
The weather was turning cooler with sand storms. In the evening a parachutist and coast landing alert was sent out by Division. "D" Coy was detailed to take up a position as beach defender along a line of 3 artillery observation posts east of the harbour. The battalion stood to in the morning and evening.
17th November
"D" Coy returned with nothing to report. One platoon remained there, one section to guard each post.
The plan for the breakout was slightly altered as the result of the discovery of more enemy posts.
One Coy of Bedfords and Herts came under control of 2nd BW.
Gale and heavy rain swamped most dugouts in the night.
18th November
During the morning Company and Tank Commanders met to co-ordinate plans.
Battalion Operation Order 3 issued.
OVERVIEW OF OPERATION CRUSADER
The plan was for the 2 Divisions of the 8th Army, under General Cunningham, to advance north and east towards Tobruk.
The 30th Corps, under General Norrie, (consisting of 7th armoured division, 4th armoured brigade group, 22nd Guards Brigade group and 2 brigades of the 1st South African Division) was to deliver the main attack.
Its orders were to make a wide sweep on the desert flank and then engage and defeat Rommel's armour. Having done this they were then to strike northwards to Tobruk.
It was for Norrie to order the Garrison to make its sortie from Tobruk at the crucial moment.
Meanwhile 13th Corps under General Godwin-Austin (4th Indian Division, the New Zealand Division and the 1st Army Tank Brigade) was to attack and pin down the Axis forces frontier defences from Halfaya (in the north) to Sidi Omar (in the south). Having outflanked them they were to push on to Tobruk.
In the overall scheme of the plan the relief of Tobruk was to be an added bonus following on from the expulsion of the Axis forces from Cyrenaica and ultimately North Africa.
THE PLANNED SORTIE FROM TOBRUK
Around October 16th 1941 General Scobie informed Brigadier Willison, the Tank Brigade Commander, that a breakout was being contemplated and that he was to make plans accordingly.
The attack would be mainly by tanks but at least one infantry brigade and one field regiment would be available with all attacking troops being under Willison's command.
The fortress had by then been invested and the area to the SE face which had been open had now very strong posts, mined and wired, erected upon it by the enemy.
This was the area that was most suited to a tank operation as well as having the advantage of the escarpment being some 10 miles from the perimeter, and not closely overlooking it, as was the case to the south and west.
Two weeks later Scobie informed Willison of the plans of the C-in-C that prior to the outbreak the 8th Army would attack from the frontier and on the night of the breakout were expected to be within 40 miles of Tobruk and advancing towards the fortress. When this attack had made its weight felt orders would be received for the breakout to begin.
In the first instance the breach in the enemy's defences was to be to a depth of 5 miles with further advances being made only after orders from GHQ. The Bologna Division of the Italian Army mainly occupied these defences. It was reported to possess 40-50 guns with some medium artillery. The battalions were only 500-600 strong and it was estimated that about 2000 troops would be in opposition to those breaking out.
There was a strong enemy post about 5,000 yards to the SE of the perimeter known as "Tiger" and this was to be the Objective. It stretched for 1 � miles on the British front and was about 1 mile in depth containing around 36 field guns (at least 2 batteries of 105mm) and was heavily mined and wired. Once destroyed it would ease the attack on smaller posts.
The final objective of the Tobruk forces would be the Ed Duda feature some 10 miles from the perimeter. Once consolidated this would be handed over to the 8th Army attacking from the south.
4/5 miles to the west of Tiger was a smaller but strong post called Dalby Square that was on the flank of the Bologna Division. The General Staff of the Fortress Commander had wanted this as the objective but Scobie agreed with Willison.
The Tank Brigade (32nd Army TB) had the following tanks:
4th Battalion Royal Tanks - "A" Squadron 16 "I" Tanks and 1 Light; "B" Squadron 16 "I" Tanks and 1 Light; C Squadron 15 "I" Tanks and 1 Light; BHQ Squadron 4 "I" Tanks and 3 Light.
1st Battalion Royal Tanks - 50 mixed thin-skinned Tanks (light Mark VI, A9, A10, A13)
7th Battalion Royal Tanks - 70 "I" Tanks
"C" Squadron of the Kings Dragoon Guards had 30 armoured cars.
The principle preoccupation of the Tank Commander was to devise a plan to deal with the deep minefields. 6 armoured cars would follow the leading tanks carrying a sapper and a KDG trained in mine lifting. Should a tank go up on a mine they would come forward and lift them before raising the advance flag.
The attack would be delivered in 5 phases.
Phase 1
At Zero minus 10 7th Royal Tanks (supported by 16th IB) would leave the perimeter swing left and capture Butch. This post was on the flank of the line of advance and would have been dangerous to the infantry.
Phase 2
4th Royal Tanks with 2nd BW under their command would capture Tiger and any intervening post. Prior to zero there were to be Infantry in front of the Start Line removing mines. Six gaps were to be made and the mines piled up on each side of the gap with khaki tapes laid to indicate the spaces. 3 Coys of Infantry (BW) were to be lying in the vicinity of the Start Line and would advance as soon as the leading waves of tanks passed. "A" Squadron were to arrive at the SE entrance of Tiger if not delayed by mines at Z38 and "C" Squadron at the NW entrance at Z18.
Phase 3
Whilst this is taking place at Zero +24 1st Royal Tanks will have passed to the west of Tiger so as to raid the enemy's back areas as far as the enemy suspected HQ at the junction of the Bardia Rd and the Axis by-pass Rd.
Phase 4
7th Royal Tanks having rallied would attack Jack about 1 � miles to the east of Tiger. 1st Beds and Herts would support this.
Phase 5
32nd Tank brigade and 2 Yorks and Lancs will subsequently capture and hold Ed Duda.
The artillery in close support of the attack will be 1st RHA (16 25-pounders) and 2 troops of 104 RHA.
The first big problem in the plan was to assemble the 150 Armoured Fighting Vehicles close to the perimeter in the assembly area unknown to the enemy. There was also to be an echelon of transport that had to be right forward so as to replenish the tank units as they had more than one objective. There was a potential bottleneck to the assembly area as there was only one road up to the escarpment where the AFV'S could be brought forward.
The noise and assembly were to be masked by 2 feint attacks by the Poles and the Queens Regt towards the Derna Rd (Z minus 270) and south astride the El Adem to Tobruk Rd (Z minus 130).
The Royal Engineers under Lt Col Ducheyne would clear gaps through the 3 British minefields and have prepared 4 duplicate bridges so that the anti-tank ditch could be crossed.
PREPARATIONS BY THE SECOND BLACK WATCH
The troops available were the Battalion plus Carrier Platoon (1st Beds and Herts), D Coy 1st Beds and Herts, one section 54 Field Coy Royal Engineers, and one platoon 2nd Queens Regiment.
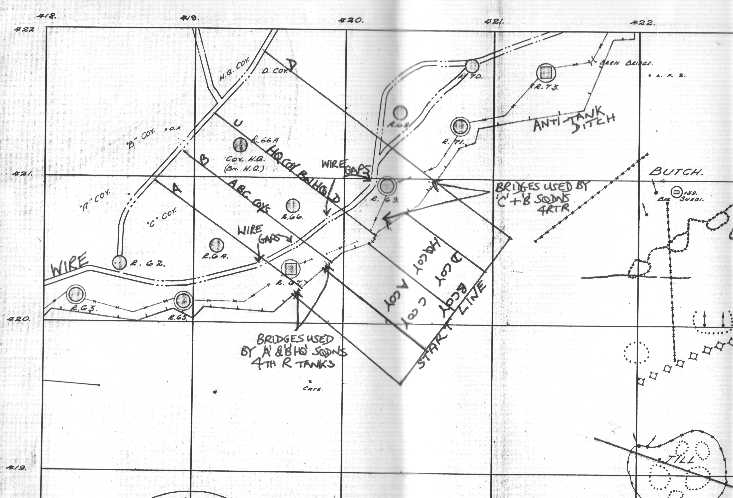
The move from assembly positions to the start line was to be marked by white tapes. Four double bridges were to be made across the perimeter and four lanes 50 yards wide laid from them to the start line.
A single tape was also to be laid from the right hand bridge of each pair to the track running from R62 to point 139. The tapes would be marked A, B, C, and D from right to left.
The Battalion was to use B and C tracks as follows:
HQ Coy. Btn HQ, and D Coy ---- Tape C
A, B, and C Coys ---- Tape B
Both ends of the route and where they passed through the minefields were to be marked by shaded lights.
The Battalion would move at platoon intervals in the order B, C, D, HQ and A Companies.
4th Royal Tanks with 4 troops of the Kings Dragoon Guards (armoured cars) were to precede the Battalion crossing the starting line at zero (this was 1000 yards in front of the perimeter with white tape laid by the Royal Engineers 60 minutes before zero). They would travel at 5mph for the first 1000 yards and then at 8mph thereafter.
"A" Squadron were on the right and would swing to the SE and force a point of entry on the south east side of Tiger. "C" Squadron on the left would follow the centre line and endeavour to force a point of entry on the NW side of Tiger. These forward squadrons would have 2 troops of KDG's immediately in rear. 10 carriers for mine and wire clearing would be behind each of the 2 troops of KDG's.
B Company would be moving "light" behind them at 4mph from the Form Up Positions with the remainder of the Battalion at 2 � mph.
The artillery would be supporting by firing a timed programme as follows:
Tugun --- Zero minus 10 to plus 10.
Sangers to Jill --- Zero to Zero plus 8.
Tiger to Jack --- Zero plus 8 to Zero plus 28
Lion to Jack and hostile batteries --- Zero plus 28 to Zero plus 70.
107 RHA were to support 14th IB with a part of 425 battery allocated to the Battalion through the Artillery Liaison Officer. Call could also be made on 1st RHA through their Forward Observation Officer moving to Tiger or on occupation.
OPERATIONS OF THE 21ST NOVEMBER LEADING TO THE CAPTURE OF JILL, SPANDAU RIDGE AND TIGER
Officers
CO Lt Col G A Rusk MC
Second in Charge Major A A Pitcairn
Adjutant Captain G A M Stirling
Commanding A Coy Capt J Ewan
Commanding B Coy Major H N Blair
Commanding C Coy Captain R Boyle
Commanding D Coy Captain J E Benson
Commanding HQ Coy Captain G Barry MC
Fighting Strength
30 Officers and 582 men.
4 RTR Operation Order 4 states 1 Infantry Battalion plus 20 carriers with Infantry. The sections of BW in carriers had Bangalore Torpedoes and wire cutters and were to operate as soon as wire held up the tanks.
Purpose
To co-operate with the 8th Army in their advance from the Egyptian Frontier. 70th Division garrisoning Tobruk was to breakout and establish the ridge at Ed Duda where contact was to be made with the advanced elements of the 8th Army. The operation would be synchronised with the arrival of the 8th Army at El Gubi 40 miles SE of Tobruk after the destruction or containing of the enemy's armoured forces.
The Battalion came under the command of 32 Tank Brigade at 1830 on 18th November.
The breakout would commence upon receipt of the codeword "Pop" - "the operation takes place tomorrow". This was received at 1715 20th November.
The Operation
The Battalion marched after dark via the Bardia Rd to the assembly area behind the perimeter FDL'S. 2nd /Lt E T Argyle the intelligence officer met each company and guided it accordingly. Companies were in position and the Battalion HQ established in post 66A by 2300.
Reveille was at 0445 when tea and rum was taken. The Battalion moved forward to the start line 600 yards in front, forming up by 0545.
Zero hour was fixed for 0630.
By Zero +2 the Tanks had not arrived. B Coy nevertheless started off followed by D, C, HQ and A unsupported except by artillery. (4RTR diary states they crossed the line at 0630).
At about Z +4 the two leading squadrons of 4th Royal Tank Regiment (4RTR) moved up B and C lanes to the start line and advanced line abreast.
However from the start they went left handed and as a result attacked the line Butch to Jill supported by the 2nd KORR. Thus squadron C of 4RTR detailed to lead B Coy of 2BW to Jill now led many of the Coy of KORR to that objective.
4RTR diary states that "C" Squadron was held up from the start on mines. They cast to the left and right attempting to find a gap and as a result considerable delay ensued. The left handed portion of "C" Squadron cast further left and became involved in the strong point Jack.
B Coy approached to see more than a half of the armoured support out of action in a minefield in front of Jill and the infantry pinned down 200 yards from the numerous well-sited and wired posts that made up that objective.
4RTR diary has it that the BW sheared off to the left of Tiger losing direction and sustained heavy casualties from Jack as well as from concealed machine gun posts to the south and west.
The fire did not hold the men of B Coy who without hesitation passed through and after a series of rushes carried the defences finally at the point of a bayonet.
3 Officers were killed and 2 seriously wounded (one of them mortally) and of the thirteen NCOs seven were casualties. The Company strength was reduced by one fifth. However the attack was pressed home with unflinching courage until the last German had surrendered or had been killed.
D Coy behind B Coy shared in the action mopping up the last remaining pockets at a cost of Captain Benson and 5 men wounded.
The carrier platoon had suffered heavily on the minefield with only one carrier remaining. The CO's carrier and reserve truck were both put out of action with Lt Col Rusk narrowly escaping when his truck was demolished. He now had to ride pillion on the gunner's carrier. The FOO's W/T set had now to be relied upon.
A large number of prisoners were taken at Jill but the 2000 yards from the perimeter was marked by a mass of rifles bayoneted into the ground to mark the spot where the wounded lay. The stretcher-bearers were collecting these men into groups as well as helping the MO to give first aid.
By 0715 Jill had been taken and a Coy of Beds and Herts installed. 2BW now had to push on towards Tiger, which was the ultimate objective. Observation and control was being made difficult by a patchy mist and dust thrown up by the shells and tanks.
Over all the noise and through the murk could be heard the sound of the Pipes. Pipe Major Roy had been playing "Highland Laddie", "Lawson's Men" (a tune based on an incident that took place during the Indian Mutiny) and the "Black Bear" (traditionally played when the men are coming into Barracks and a last final effort is required) since the advance began and undoubtedly this inspired the Battalion to take Jill in the spirited manner that they had.
It was now evident that the line of advance was bearing left of the required line. The first reason for this was that initially the battalion had not been square to the objective, as the start line had been laid 28 degrees in error of the axis of advance. Therefore, the battalion line, with its left thrown back, was difficult to maintain. The difficulty was increased by the noise and visibility. Secondly Jill faced westerly and the necessity to turn square onto this objective drew the battalion further leftwards.
All of this meant that B Coy, which was leading, had to forsake direction in order to overcome opposition if the threat to the left was to be overcome and the battalion's advance continued. In addition they had lost all of their officers and therefore all compasses.
The direction of the attack following on from the successful assault on Jill was determined by the way in which the battle developed from that point. 2 well concealed and well wired posts on the line Jill to Jack maintained the drift left. These were dealt with by 11 platoon B Coy supported by mortars. During this action Sgt A Scobie, Cpl Mellon and 2nd Lt Cromarty were killed.
At the same time as these two incidents the main body of the battalion was advancing under heavy fire in the direction of the Observation Post which stood on the only commanding ground in front of what was thought to be Tiger but which in fact was Spandau Ridge. This feature was not known as it did not feature on aerial photographs and therefore was not included in any tank or artillery programmes.
This presumption was encouraged by the amount of machine gun fire that was coming from that point and that the retreating enemy was making off in that direction.
Further the flat featureless ground undulated just enough to conceal the defended localities, which were the only physical guides. In addition Tiger had no wire and was therefore only recognisable at very close range.
Although the frontal fire was increasing in intensity, causing the losses in B Coy to increase to 60%, the Company continued to press on, returning fire, until the leading sections were within 200 yards of Spandau ridge. The rest of the battalion was still behind in the order in which they started which was a credit to the Officers NCOs and the discipline of the men.
It was at this point that 2/Lt P Hill and CSM Scott had remained at the Observation Post dispersing and directing the groups of men who had collected there. They were an obvious and easy target and carried out their task at great risk to themselves until 2/Lt Hill was wounded and CSM Scott was killed. Pipe Major Roy (who was to become known throughout Scotland as "The Piper of Tobruk") was wounded 3 times before he finally stopped playing. Sgt McNicol took over.
Amongst the casualties at this stage were:
Killed - Major Pitcairn, Captain Wilder.
Wounded - Captain G A M Stirling, 2/Lts E Lee, P Hill, A McBain, R MacDonald, J C Donaldson, G B W Donaldson, and A Blair.
It was now realised that further advance without tank or artillery support would result in decimation of the battalion and a failure of the attack. Spandau ridge had been held for some time by at least a battalion and this made it even more surprising that it did not feature on any photographs.
In 14th IB War diary it is recorded that at 0750 the 2BW were in difficulties behind Jill and that the reserve squadron of 4RTR had been ordered to help them onto their objective.
For over an hour the battalion now less than 200 strong was pinned down by deadly machine gun fire with desert scrub the only cover. Nevertheless return fire was maintained whilst awaiting the arrival of the tanks.
The tanks arrived at 0900 and passed between the platoons advancing onto the objective engaging the machine guns whilst the infantry engaged the A/T guns. The hostile fire immediately decreased which gave the opportunity for the infantry to resume the attack.
There was no need for hand-to-hand fighting as the objective was gained only in time to round up prisoners who were surrendering everywhere except in a group of machine gun posts to the SW of the defences. These posts continued to resist until overrun by he tanks and the remnants of B Coy.
Prior to the assault on Spandau Ridge the CO suspecting that the Battalion had veered away from Tiger went off in that direction to reconnoitre and found Tiger unoccupied except for a few Italians hiding in their dugouts. The tanks had overrun the position earlier in the day. And the garrison had surrendered or been killed.
In fact "A" Squadron of 4RTR on the right although held up by mines had eventually effected a passage and succeeded in forcing an entry into the SW of Tiger.
The CO ordered Captain Barry to lead HQ Coy to Tiger and occupy it. And standing in the FOO's carrier directed the remaining Companies onto the final objective.
4RTR states that Tiger was fully occupied by 1015.
Here the remnants of the battalion - 5 Officers (Col.Rusk, Capt.Barry, Capt.Boyle, Capt Ewan and Lt. D C Menzies) and 160 men - who had crossed the start line 3 hours, took up positions in box formation and consolidated Tiger. HQ Coy under Captain Barry held the front face; B, C and D reduced to one Coy held the left face under Captain Boyle and A Coy with the remaining Royal Engineers under Captain Ewan the right.
12 field guns had been left behind along with 30 plus machine guns. They helped to thicken the battalion's fire during subsequent days. A German Officer and 3 men crept forward to grenade distance but all were killed and no further attempts were made.
Soon a Coy of Bedford and Herts arrived to strengthen the position. They took over the front face leaving HQ Coy to protect the rear.
At 1300 a large body of motorised infantry were seen gathering to the south of Spandau ridge readying to counter-attack. An urgent signal recalled the tanks and a prompt artillery barrage was sufficient to disperse them.
The rest of the day was spent in improving defences by mining, wiring and reorganising into composite sub-units. Fierce spasmodic shelling carried on throughout the day but there were no casualties. Companies stationed listening posts on their front during darkness but there were no incidents.
A second company of Beds and Herts arrived during early night but were re-directed to Jack where the FOO had been requesting reinforcements. Prisoners continued to come in bringing the total to around 500.
The Battalion's casualties were 6 Officers and 58 men killed with 16 Officers and 196 men wounded of whom 15 died of their wounds.
This site and all contents contained within are copyright (c) Ian Davidson 2002. Reproduction of this site is strictly prohibited without the authors written permission.